Sponsored Links
Our FREE E-LEARNING AUTOMATED REVIEWERS


Topics
- TLE
- Science
- Mathematics
- History
- Literature
- Home Economics
- Physical Education
- Music and Arts
- Philosophy
- Philippine Studies
- Language Studies
- Social Sciences
- Debate
- Extracurricular
- Religion
- Preschool Lessons
- Journalism
- Education
- Life Lessons
- Others
- AP (Social Studies)
- EsP (Values Education)
- Filipino
- English

THE WINDOWS MOVIE MAKER
The Windows Movie Maker (WMM)
by: Purita S. Española
 Windows Movie Maker is a feature of Windows Vista that enables you to create home movies and slide shows on your computer, complete with professional-looking titles, transitions, effects, music, and even narration. And when you’re ready, you can use Windows Movie Maker to publish your movie and share it with your friends and family.
If you’re new to digital video editing or just new to Windows Movie Maker, keep reading for an introduction to the different tools you'll use in Windows Movie Maker and for links to help you learn more.
HISTORY OF WINDOWS MOVIE MAKER
Microsoft's free video editing program has been around the industry for more or less 13 years now. Since it is bundled with the Windows OS, Windows Movie Maker has undergone multiple versions already. We trace back Windows Movie Maker's beginnings with this brief historical review.
WINDOWS MOVIE MAKER - VERSION TIMELINE
In summary there are actually 7 versions of Windows Maker starting from its first version in 2000 and up to the 2007 version which is called Window Movie Maker 6.
• 2000 : Windows Movie Maker 1.0 (Windows Me)
• 2001 : Windows Movie Maker 1.1 (Windows XP)
• 2002 : Windows Movie Maker 2.0 (Windows XP)
• 2004 : Windows Movie Maker 2.1 (Windows XP SP2)
• 2004 : Windows Movie Maker 2.5 (Windows XP Media Center Edition 2005)
• 2006 : Windows Movie Maker 2.6 (Windows Vista)
• 2007 : Windows Movie Maker 6.0 (Windows Vista)
UNDERSTANDING THE WINDOWS MOVIE MAKER TOOLS
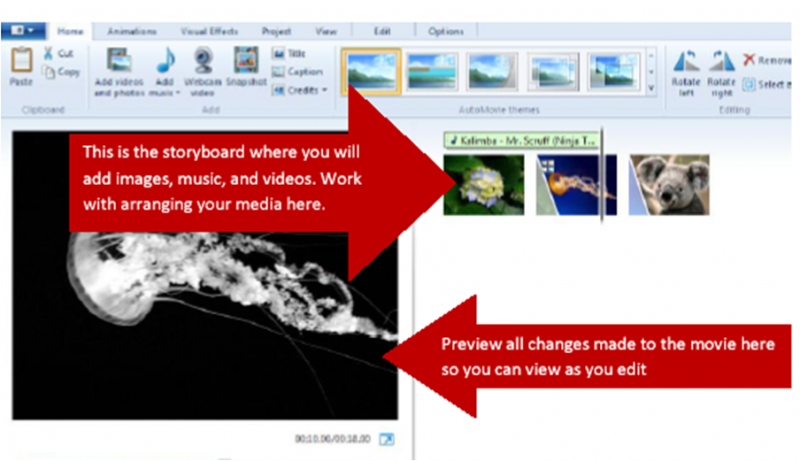
Windows Movie Maker is divided into three main areas: the panes, the storyboard/timeline, and the preview monitor.
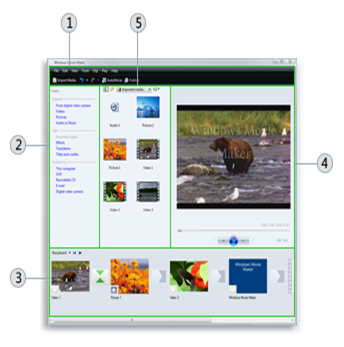 THE MOVIE MAKER INTERFACE
Using the Tool Bar
WORKING WITH PHOTOS, VIDEO AND MUSIC
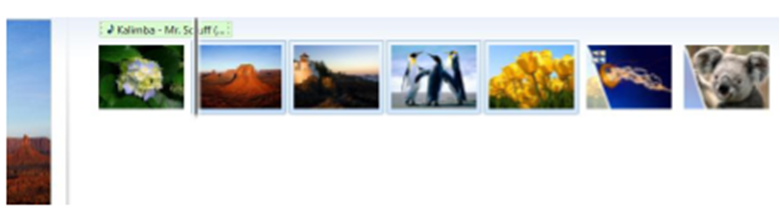
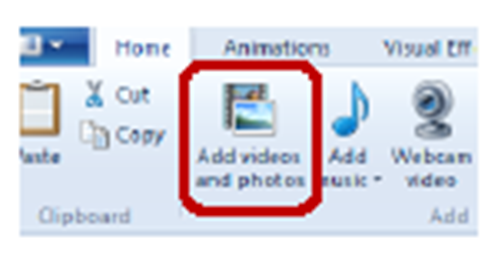
ADDING PHOTOS
To add photos to your project
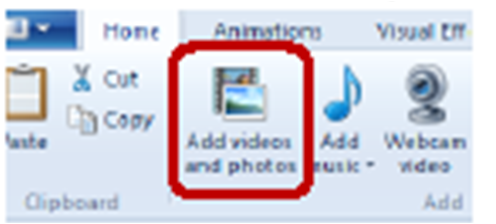
1. Under the Home tab, in the Add box, add videos and photos.
2. Browse through the photos in your documents and select the ones you wish to add to the storyboard. Hold the CTRL key to select multiple photos at once.
3. Your added photos will appear on your story board. To rearrange the photos, click the photos, click on the photo, then drag and drop the photo in the desired space.
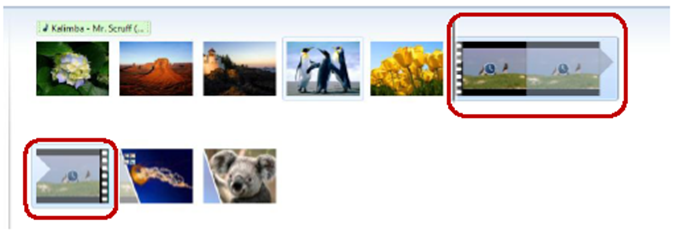
ADDING VIDEO
To add video,
1. Under the Home tab, in the Add box, select Add Videos/ photos.
2. Find the video you wish to add in your documents. The video will then appear on the storyboard among 2. Click and drag the left end bar to set the start point, and click and drag the right end bar to set the End point.other media you have already added.
EDITING VIDEO
1. Click on one of the panes for the movie and on the toolbar, under the edit tab, Click Trim Tool.
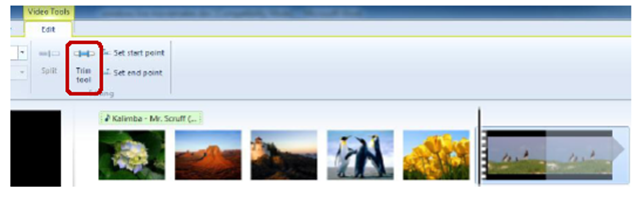
2. Click and drag the left end bar to set the start point, and click and drag the right end bar to set the End point.
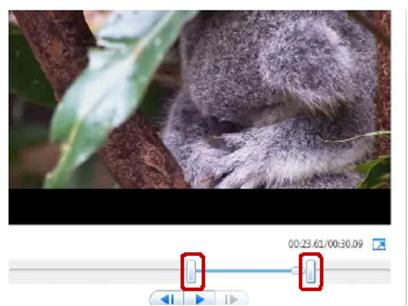
3. If you already know the exact timing for the start and End points for the clip of the video, simply enter them in the tool bar in the start point and End Point.
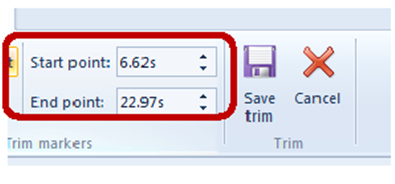
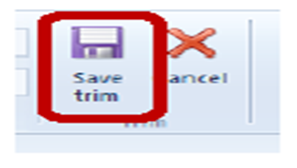
4. When you have completed trimming the video, click save trim.
5. To move the location of the video with in the project, move as you would a picture.

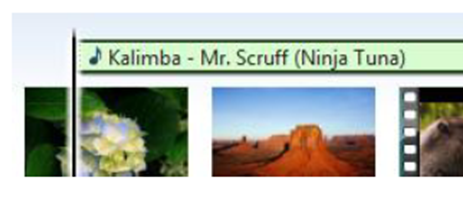
ADDING MUSIC
To add music,
1. Under the Home tab, select Add Music, choose whether you would simply like to add music and then choose the start time later, or enter music at the exact current point (the location of the moveable black bar.)
2. In your music library, choose the music piece you wish to add and click Open. The music sample will then appear above your images and videos.
EDITING MUSIC
To edit music,
1. Click the music sample and then on the toolbar, click Options.
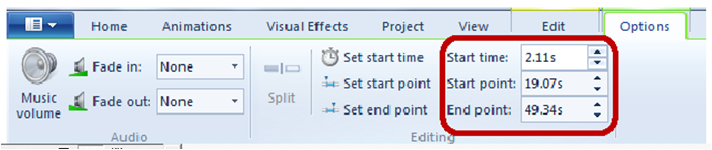
2. The easiest way to set a start time and end time for music in Windows Live Movie Maker is to manually enter the time values. The start time is the time into the movie; the music actually begins playing (example 30 seconds into a song). The End Point is the time you wish the music to stop playing (this time is also the time into the selected music clip, NOT the time into the movie.
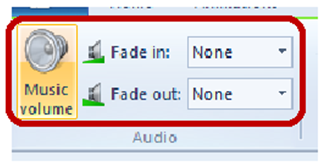
3. Additionally under the options tab, specify the Music Volume, if you would like the music to fade in/out, and the speed at which it will fade.
4. Note: If you wish to ever, remove a music clip, movie clip, or picture/image with in your movie, click the media item you wish to Remove under Home tab on the editing pane.

WORKING WITH ANIMATIONS
Adding Animations
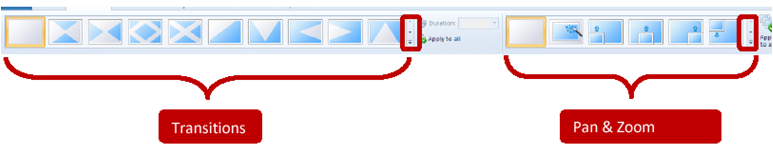
Animation can be added to movies to add special effects to transitions between images and videos. There are transitions which add exciting and eye catching effects and pan and zoom options which slowly zoom in/out when an image or video is on the screen. To add animations,
1. Click the image or video pane you wish to add the animation to.You cannot simply drag and drop animation to the desired pane you wish.
2. After clicking the pane, it should be highlighted.

3. Under the Animation tab, scroll the mouse over the various transitions and pan and zoom options to get a preview or how animation will look. When you find an animation you like click the animation to apply it to the image/ video. Use the arrows to the right of the options to scroll up and down to view more animations.
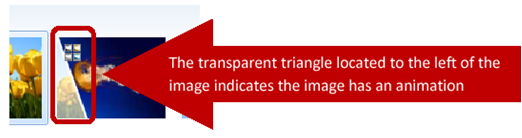
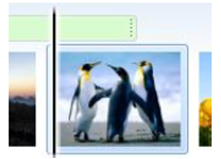
4. To indicate if an image or video has an animation. A transparent triangle will appear on the pane.
Note: To get rid of an animation, click to highlight the pane of the image video and then click the blank option at the beginning of the Transitions and pan and Zoom options.

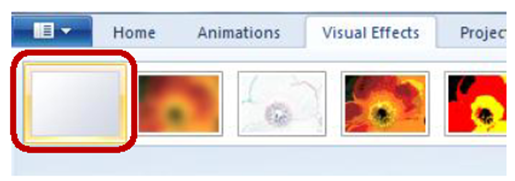
Adding Visual Effects
Visual effects can be added to movies to add special effects to the actual images and videos. Users can change colors, add ripple effects and add other visually stimulating effects to specific images and/ or videos. To add visual effects,
1. Click the image or video pane to which you wish to add the effect. This is the most important step, because this is how Movie Maker will know where to add the effect. You cannot simply drag and drop an animation to the desired pane you wish.
2. After clicking the pane, it should be highlighted.
3. Scroll the mouse over the various effect options to get a preview of how the effect will look. When you find an effect you like, click the effect to apply it to the image/ video. Use the arrows to the right of the options to scroll up and down to view more effects.

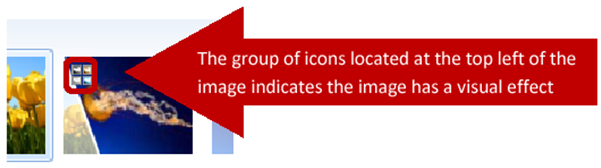
4. When an image or video has an effect applied, it will be designated by a group of icons, in the upper left corner as show below.
Note: To get rid of an effect click to highlight the pane of the image/video, and then click the blank option at the beginning of the effects options.
The Final Touches
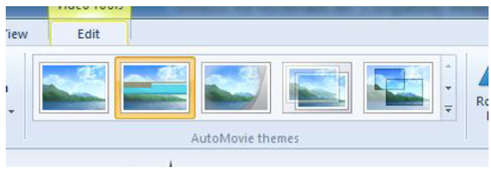
Auto Movie Themes
Auto Movie Themes are a great shortcut if you want Movie Maker to take your media and create a video for your complete with transition, introduction slides, etc. To use an auto Movie Theme,
1. Under Home tab, in the center of the toolbar is the Auto movie Themes options. Browse through the various options and roll your mouse over each to view a preview. When you found one you like, simply click the options.
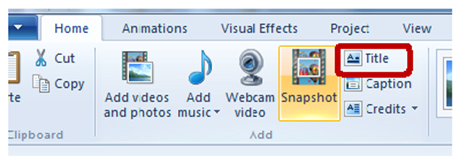
Adding a Title Slide
To add a title slide,
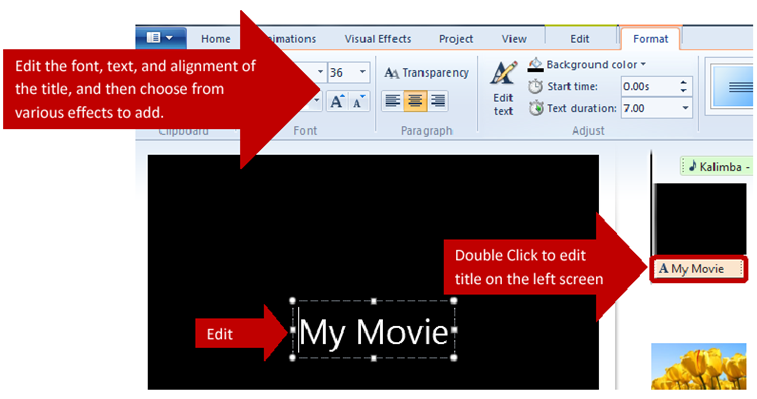
1. Under the Home tab, click title in the add section.
2. After adding a title slide. A Format tab will appear. To edit the title, double click the current tittle under the slide on the storyboard, and that box will appear on the preview.
Adding a Credits Slide
To add a credits slide,
1. Click the down arrow next to the Credits in the Home tab.
2. Choose the type of credits you would like to add the end of the movie. The credit slide will appear at the end, and simply click in the text box on the preview screen to the left to enter your text.
Adding Captions
To add captions to the image or videos,
1. Click and highlight the pane of the image or video you wish to add a caption to, Under the Home tab, click Caption.
2. On the Preview Screen to the left, simply click inside the textbox to enter your caption. Use the formatting features under the Format tab.
Sharing the Video
There are several options to save and utilize your movie with Windows Movie maker. Under the Home tab. These options are located to the far right in the share category.
Note: Windows Movie Maker supports only the following file types. You can import files with. The following file name extensions into the Windows Movie maker to use in your project:
Audio Files: .aif,.aifc,.asf,.au,.mp2,.mp3,.mpa,.snd,.wav,.and,.wma
Pictures Files: .bmp,.dib,.erf,.gif,.jpif,.jpe,.jpeg,.jpg,.png,.tif,.tift,.wmf
Video files: .asf, .avi, .mlv, .mp2, .mp2v, .mpe, .mpeg, .mpg, mpv2, .wm and .wnv.
Here are some links to topics that go into detail about the things you can do in Windows Movie Maker:
- · Import new video from a videotape in your digital video (DV) camera
- · Import existing video files, pictures, and audio
- · Trim, rearrange, and copy imported audio and video clips
- · Add transitions and effects to a project
- · Add movie titles and credits to a project
- · Publish your movie to share in different ways
References:
1. http://windows.microsoft.com/en-ph/windows-vista/getting-started-with-windows-movie-maker Getting started with Windows Movie Maker
tu� ap��_�>https://www.google.com.ph/?gfe_rd=cr&ei=dM0gVNaNDOmV8QetkICwAQ#q=history...
3. http://www.brighthub.com/computing/windows-platform/articles/16044.aspx
Photos:
Tag: The Windows Movie Maker/ WMM/ Movie maker/ PSEspañola)
Subjects:
Sponsored Links
OurHappySchool RECOMMENDS


Add new comment